A company-wide SharePoint calendar packed with cross-department events is hard to read when every entry looks the same. Color-coding is the simplest fix — one glance and you can tell HR onboarding from a marketing launch from a finance close. SharePoint offers two built-in paths: the classic Calendars Overlay (up to ten color-coded layers, classic sites only) and the modern Lists calendar view with view formatting (single list per view). Neither combines multiple sources — Exchange, Planner, room mailboxes, iCal — into one color-coded view. This guide walks through both built-in paths and the third-party option that does.
| Quick answer: SharePoint’s native calendar has no built-in way to color-code events by category. To color-code SharePoint calendar events on modern pages, use the Virto Calendar App. It supports multi-level color coding (by source and by category), an unlimited number of overlays, and works across SharePoint Lists, Exchange, Planner, iCal feeds, and meeting rooms. Free for up to 5 users. |
Before & After: What Color-Coding Actually Changes
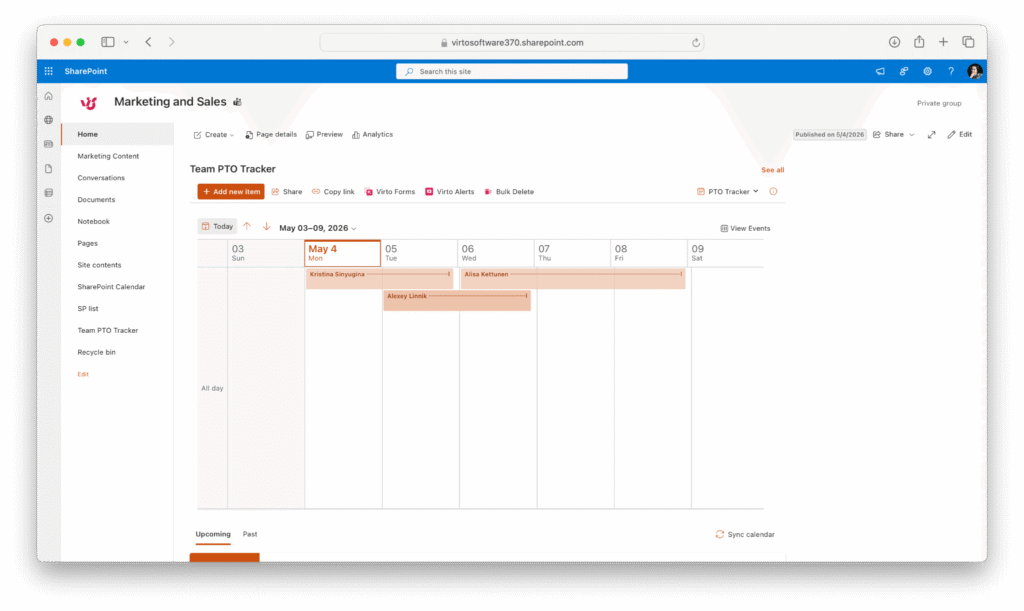
A flat SharePoint calendar forces users to read every event title to find what matters. A color-coded calendar lets the eye filter at a glance — by department, event type, or priority. The screenshot below shows the same calendar set up with Virto Calendar App, with each data source assigned its own color.

Before — flat, single-color SharePoint calendar.
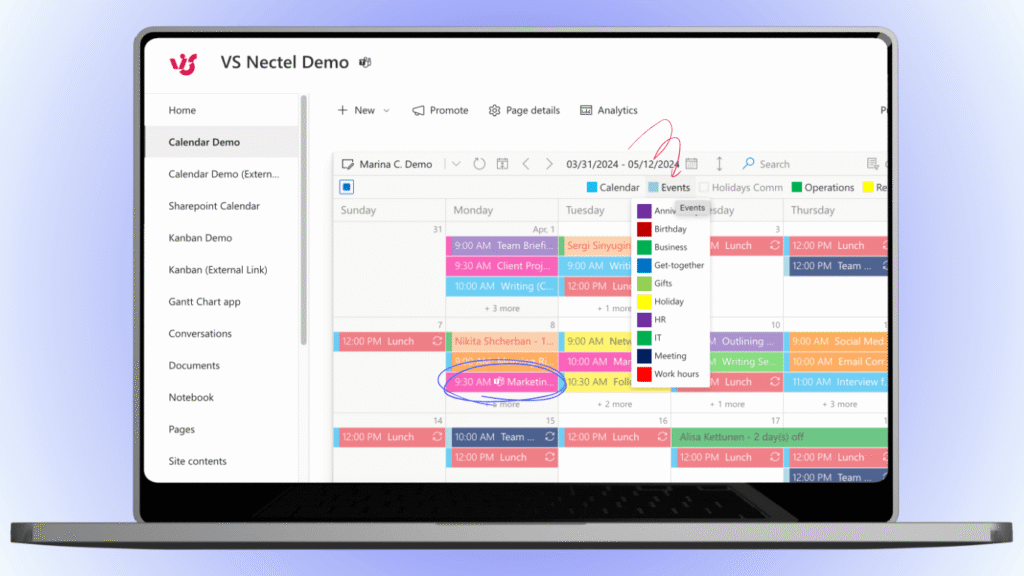
After — Virto Calendar App with color-coding by data source.
Why Color-Code a SharePoint Calendar?
Color is the fastest visual filter the brain has — significantly faster than reading text. On a busy company calendar with 50+ events per month, color coding lets people scan by category in seconds: department, event type, project phase, room, or priority. Not sure whether the effort is worth it for your team? See our companion guide on why calendar color coding improves productivity.
Native vs Virto Color-Coding: What’s Possible
Before walking through the methods, here’s what each approach actually supports. The table below makes the trade-offs explicit so you can pick the method that fits your environment.
| Capability | Native SP Calendar | SP List + JSON | Virto Calendar App |
|---|---|---|---|
| Color per calendar/source | ✓ (classic overlay only) | ✗ | ✓ |
| Color per category/type | ✗ | Partial (fragile JSON) | ✓ (built-in) |
| Multi-level (source + category) | ✗ | ✗ | ✓ |
| Auto-generated legend | ✗ | ✗ | ✓ |
| Works on modern pages | ✓ (list calendar view) / ✗ (overlay) | ✓ (list view only) | ✓ |
| Combine multiple sources | ✓ (classic overlay, 10 cap) | ✗ (single list) | ✓ (unlimited, any source) |
Method 1: Color-Code SharePoint Calendar Events with Virto Calendar App
This is the fastest path on modern SharePoint and Microsoft Teams. Virto Calendar App lets you assign one color per data source and a second layer of color coding per category — without scripts or calculated columns.
Step 1 — Add the Virto Calendar App web part to a SharePoint page
Open the modern SharePoint page where you want the calendar. Click Edit, then add the Virto Calendar App web part from the web part picker. If you don’t see it, install it from Microsoft Marketplace first.
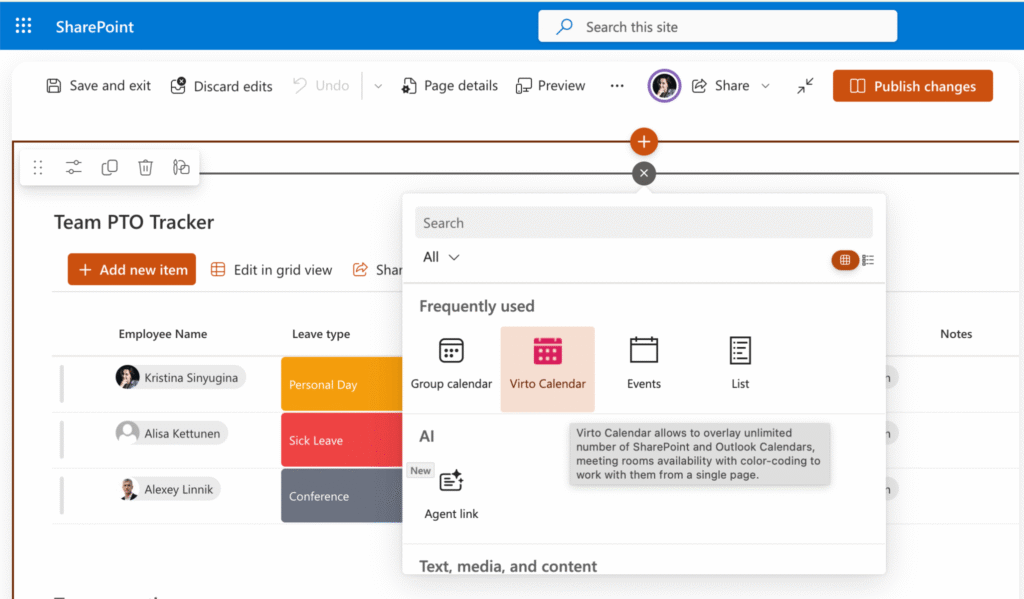
Step 2 — Connect your data sources
Click the gear icon on the web part to open settings, then add a data source. Virto supports SharePoint Lists, Exchange/Outlook calendars, Microsoft Planner, iCal feeds, Google Calendar, and Exchange room mailboxes. Add as many sources as you need — there’s no overlay limit.
Step 3 — Assign a color per data source
In the data source settings, open the color picker and pick a distinct color for each source. For most teams this is the first level of color coding (e.g., Marketing = green, HR = blue, Finance = orange).
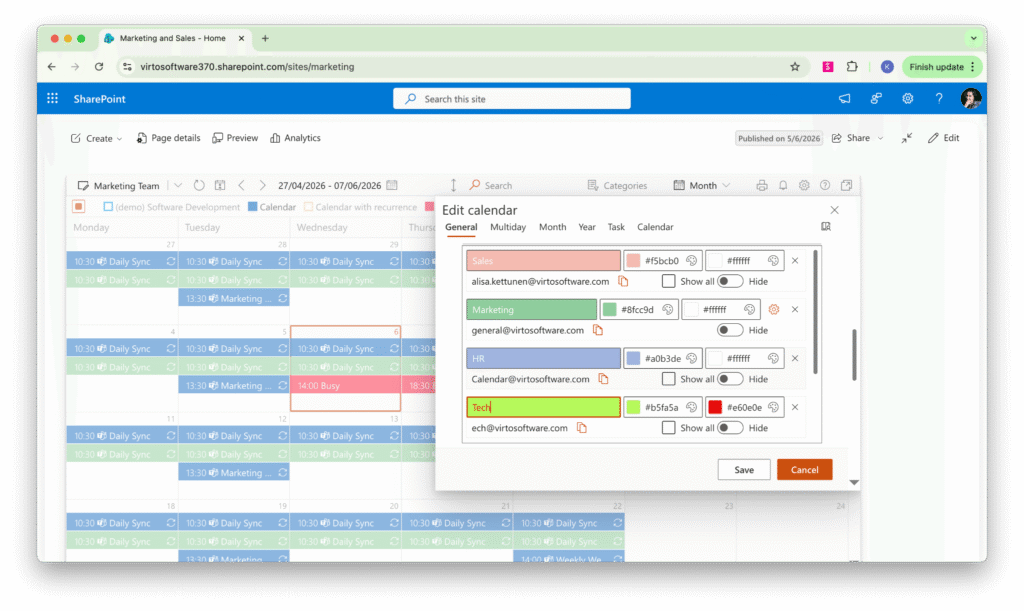
Step 4 — Add a second level of color coding by category
Inside each data source, choose the field you want to color-code by — Category, Event Type, Location, Priority, or any other field in the underlying list or calendar. Assign a color per value. This produces multi-level color coding: the source color frames the event, while the category color signals the type within that source.
Step 5 — Enable the legend and save
Turn on the auto-generated legend so users can decode colors at a glance, then save the web part. The calendar will refresh and show your color-coded events. End users don’t need any training — the legend is always visible.
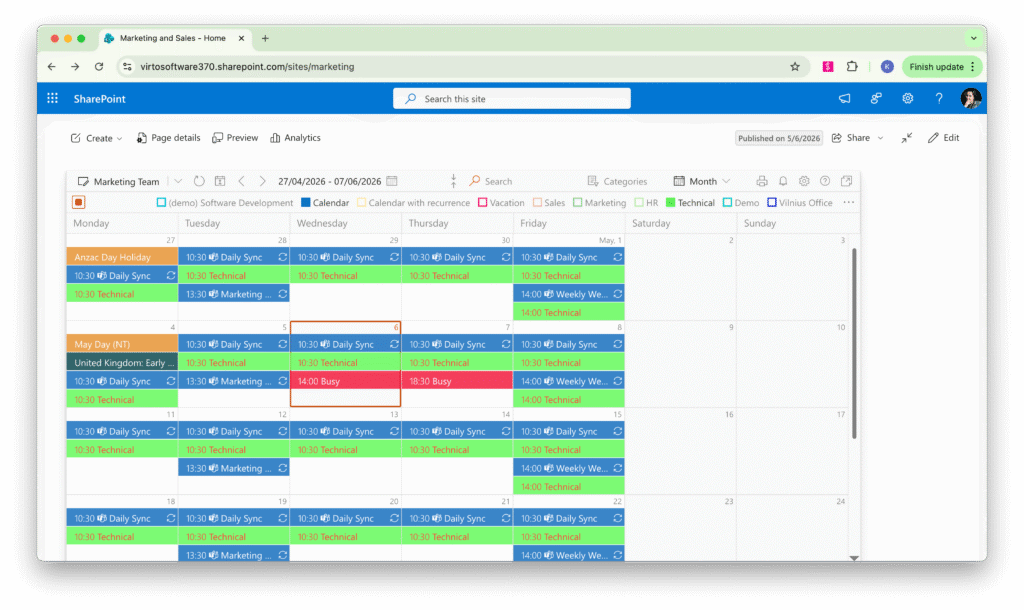
Virto Calendar App color-coded calendar
| Tip: Stick to 5–7 distinct colors per calendar. Beyond that, distinguishing categories becomes harder than reading the text. If you have more sources, group them by department or project phase before assigning colors. |
Method 2: Overlay Calendar Views (Classic Calendar App)
A note on what is and isn’t modern: Microsoft now offers a calendar view on modern SharePoint Lists, and that view supports per-item color formatting (via column choices, view formatting JSON, or built-in category coloring). What’s not available on modern pages is the classic Calendars Overlay feature shown below — overlaying multiple calendar views into one with up to ten color-coded layers. That overlay capability still requires the classic calendar app. The walkthrough below covers the classic overlay approach; if you’re on a modern list and just need color per event, see the modern list calendar view note at the end of this section.
Create a SharePoint calendar as shown in the How to Create a SharePoint Calendar blog post. Now you can set up event categories. Open List Settings from within the Calendar tab.

Find the Category column.

Type in your categories or leave the default ones and click OK.

Now you can create a calendar view for each event category: click Create View in the Calendar tab.

Choose a calendar view type and specify the name of your new view. Then add a filter to show the calendar items of a chosen category. Make sure the value for the filter matches your category name. Save the view and do the same for each category.

Next, create a blank calendar view to overlay your category views on. For example, add the Default Calendar view and apply the filter “Category is equal to [blank]”. Set this view as default.
![“Category is equal to [blank]”. Set this view as default.](https://pub-b3bf75c9856b4a14b0b5c25323551564.r2.dev/2016/06/image.png "image1.png")
Now you can overlay multiple calendar views — click Calendars Overlay in the Calendar tab.

Click New Calendar.

Fill in the required fields. Click Resolve to get the list of available calendar views within your SharePoint site. Choose the required view and select your color for that view. Repeat this for each calendar view.

When you have finished with all the overlays, you’ll see a color-coded SharePoint calendar.

Limitations of the classic overlay method:
- It takes significant time to set up — one view per category.
- There’s a hard limit of ten overlays per calendar.
- Changing the color palette requires developer involvement.
- Requires the classic calendar app — the modern Lists calendar view doesn’t expose Calendars Overlay.
Modern alternative: SharePoint Lists calendar view
On modern SharePoint, you can add a calendar view to any List that has a Date column. To color-code items in that view: open the list, switch to a calendar view, then either use a Choice column with category colors set on the choices, or apply view formatting JSON to color events conditionally. Learn more about this method in our article »>
This colors events from a single list — it isn’t an overlay, so to combine multiple lists, calendars, or Exchange room mailboxes in one color-coded view you still need a tool like Virto Calendar App (Method 1).
Method 3: Calculated Column + Content Editor (Classic, Advanced)
This older approach uses a calculated column and a content editor script to color-code events. It’s fragile (script-based, classic only) but useful if you can’t install a third-party app and need more flexibility than overlays allow. The same technique works for color-coding any SharePoint list, not just calendars.
As described in Method 2, create a category column for event categories in your SharePoint calendar. In this example we’ll name it “Event type” — pick any name you like.
Next, select Calculated for the type of information contained in the column and insert the following formula into the Formula text-entry field:
“|||” & [Event type] & “|||” & [Title]
!["|||" & [Event type] & “|||” & [Title]](https://pub-b3bf75c9856b4a14b0b5c25323551564.r2.dev/2016/06/image-8.png "image9.png")
Create a new view (or modify the default view) and replace the name of the month, week, and day views with the name of your created column — for example, “Event type.” This feature is also available for SharePoint group calendars.

Insert the color-coding script into the Content Editor web part: choose Click here to add new content, then Edit Source, paste the script, and click Save.

Color-Coding Ideas for Your SharePoint Calendar
Not sure what to color-code by? Here are four schemes that work well for most teams. Pick one — mixing schemes within a single calendar tends to confuse rather than help.
By department
HR = blue, Marketing = green, Engineering = purple, Finance = orange, Operations = grey. Best for cross-team master calendars where the audience needs to spot their own department first.
By event type
Meetings = blue, Deadlines = red, OOO/PTO = grey, Social = yellow, Training = green. Best for team-level calendars where everyone is in the same department.
By priority
Critical = red, Normal = blue, Low = green. Best for project calendars and incident-response schedules where escalation matters more than category.
By location or floor
Floor 1 = blue, Floor 2 = green, Floor 3 = orange. Best for meeting-room booking calendars and hybrid offices where physical location is the primary filter.
For an expanded list of category ideas, see calendar category ideas.
Frequently Asked Questions
Can I color-code a SharePoint calendar by category natively?
Not directly. Native SharePoint calendars only support color per overlay (i.e., per view), not per category. To color-code by category natively, you need to create one calendar view per category and overlay them — capped at ten. For multi-level color coding by category, use the Virto Calendar App.
Does color-coding work on modern SharePoint pages?
Yes — with caveats. On modern SharePoint, you can add a calendar view to any List with a Date column and color events using Choice column categories or view formatting JSON. The classic Calendars Overlay feature (combining up to ten calendars into one color-coded view) is classic-only and isn’t available on modern pages. The modern Events web part also doesn’t support category color coding. To overlay multiple sources in a single color-coded calendar on modern pages or in Teams, use the Virto Calendar App.
How many calendars can I overlay with color-coding?
Native SharePoint caps overlays at ten. Virto Calendar App has no limit — you can overlay SharePoint Lists, Exchange calendars, Planner, iCal feeds, and Exchange room mailboxes in one view, each with its own color.
Can I change the color of a single event?
In native SharePoint, no — color is assigned per view. With Virto Calendar App, you can color-code by any field on the underlying item, so single-event color is controlled by setting that event’s category, priority, or custom field value.
Does color coding sync between SharePoint and Outlook?
Color coding lives in the calendar layer, not on the underlying event. SharePoint colors don’t flow into Outlook and vice versa. Virto Calendar App reads from both Exchange and SharePoint and applies its own color scheme on top, which is the way to get a consistent color scheme across sources.
Ready to Color-Code Your Calendar?
| Next step: Install Virto Calendar App from Microsoft Marketplace. Or schedule a consultation with our team to map a color-coding scheme to your environment. |
Useful Links
- Public Folder Calendar in MS Teams
- Combine Outlook, SharePoint & Google calendars in one view
- Why you need to color-code your calendar (productivity benefits)
- Calendar App for Office 365
- How to Share Tasks from MS Planner with Virto Calendar and MS Teams
- Export ICS files to Outlook
Need help with your solving case?
We’re here to help guide your journey!